

Store ALL the Data
August, 2019
Distributed File Systems (DFS) allow us to store and access huge amounts of data as if it was available locally. Sometimes a server runs out of space or it’s simply not feasible to expect that all relevant data be stored on a single machine. With a distributed file system, we can easily add more space (and compute capacity) without impacting clients. Sounds simple enough but if we’re going to successfully handle multiple requests from multiple clients, we need to have concurrency and synchronization mechanisms in place.
My core contribution to the project was the Data Node; it will be the focus of this discussion. GitHub project
Basic Architecture
There are three types of actors: Client, Name Node, and Data Node. For this project we have one Name Node that communicates with multiple Data Nodes and Clients. Data Nodes store information or “data” in fixed blocks of size 4 MB.
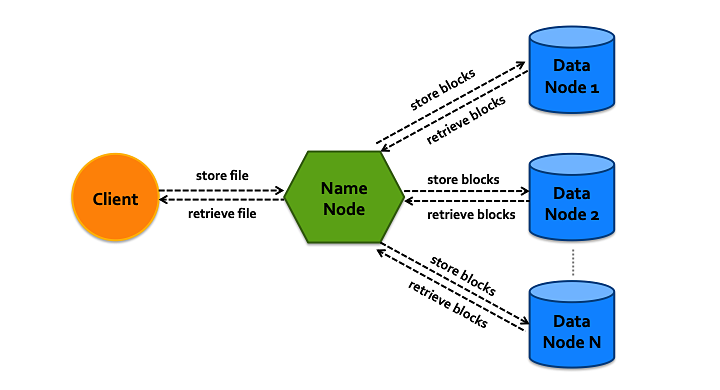
Clients send requests to Name Node; they can either APPEND data to a file or READ from a file. For APPEND commands, Name Node finds free blocks on one or more Data Nodes for storage. With READ commands, Name collects applicable blocks from Data Nodes and assembles them in order to return to the Client.
It’s important to utilize threads to ensure that Name Node and Data Nodes can handle multiple requests. Each incoming request is processed as a new thread. Data Nodes have additional data protection mechanisms in place that allow parallel access without issue.
Communication Design
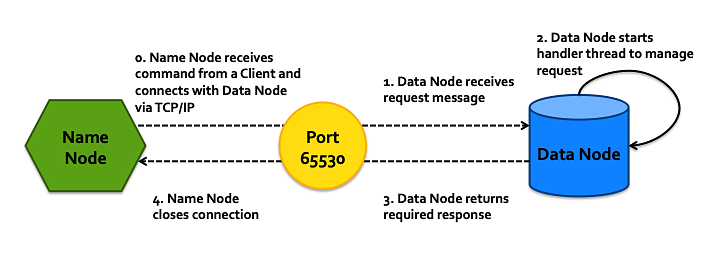
Name Node needs to be able to communicate with both clients and data nodes seamlessly. Thus, Name Node is a server to Clients and a client to Data Nodes. Processes share data through ports over TCP.
To ensure synchronous communication, Name Node creates a thread of type NameNodeHandler for each Client request. The Name Node Handler then creates its own connection to Data Nodes - who are always listening on a specific port number. Name Node creates a new connection every time it wants to communicate with a Data Node.
Relevant Files
- Client.java
- NameNode.java
Name Node
Name Node is the middle man of the DFS as it communicates with both Clients and Data Nodes. Its core job is to maintain a record of which blocks to request from a Data Node if, or when, a Client makes a request. Because Name Node can field multiple simultaneous client requests - using Name Node Handler threads - the map containing a record of blocks on Data Nodes is protected by a mutex.
When receiving an APPEND request, Name Node first splits the data into 4 MB blocks then contacts a Data Node to request a free block. If a block is available, Data Node returns the block number and marks the block as used. Name Node then sends a WRITE request to the same Data Node. Name Node employs a Round Robin algorithm to decide which Data Node to use. Name Node simply rotates through its list of Data Nodes, requesting one block at a time, until all data has been stored.
Relevant Files:
- NameNode.java
- Pair.java
Data Node
Data Node serves as the storeroom of the DFS. It has two primary data structures: a queue of available blocks and a hashmap of used blocks. The queue and hashmap have their own individual locks (qLock for queue and uLock for hashmap); whenever a data structure is modified, Data Node first obtains the relevant lock, modifies the data structure and then releases the lock.
Code excerpt that shows using a lock when modifying the shared HashMap, used:
import java.util.concurrent.locks.Lock;
import java.util.Queue;
import java.util.HashMap;

public class DataNode {
  private Queue<Integer> availQ; //queue of available blocks
  private HashMap<Integer, Block> used; //map of used blocks (filename as value)

  //keep shared resources safe
  private final Object qLock = new Object(); //for locking available block queue
  private final Object uLock = new Object(); //for locking the used block hashmap

  //mark block as used; return block number, -1 if none available
  int alloc() {
    //get a block
    int block = -1; //return -1 if no blocks available
    synchronized(qLock) {
      if( availQ.isEmpty()) {
        return block;
      }
      block = availQ.poll();
    }

    //make a file(name)
    String filename = dataDir.toString() + "/blk_" + block + ".bin";
    synchronized(uLock) {
      Block blkObj = new Block(filename);
      used.put(block, blkObj);
    }

    ...

  }

}
All locks have minimal scope in order to prevent deadlock or excessive blocking.
Because we are simulating a DFS on a single computer, Data Node saves a block of data in its own directory: data_$port. Each allocated block of data is represented by a file: blk_$num.bin; Data Node does not put a limit on block filesize (Name Node handles 4MB limit). Of course, we could use a more complex file storage mechanism if warranted.
In practice, Name Node and each Data Node would be on independent computers. Why did we test using a single computer? Because it’s MUCH easier. With the DFS entirely contained on one computer, testing can be performed anytime, anywhere, on a single laptop.
Data Node accepts a port number as a command line argument and starts a ServerSocket on the specified port. It then listens continuously on its port and accepts a client connection from Name Node when a new message comes in. Each new message is handled in a new thread: Data Node Handler.
It is important to immediately start a new thread when a message comes in so that subsequent incoming messages are not blocked.
Simple code excerpt showing how Data Node starts a new thread via DataNodeHandler with each incoming request:
import java.net.ServerSocket;

public class DataNode {
ServerSocket dataServer = null;

  void start() {
    //allocate port
    try {
      System.out.println("Running on port:" + port);
      dataServer = new ServerSocket(port);

      while (true) {
        //use data handler to handle requests - start new thread
        new DataNodeHandler(dataServer.accept(), this).start();
      }

    } catch (IOException e) {
      e.printStackTrace();

      System.err.println("Unable to allocate port: " + port);
      System.exit(2);
    }
  }
}

class DataNodeHandler extends Thread {
  private Socket clientSocket; //connection with name node
  private DataNode myNode; //reference to data node that spawned handler

  //constructor
  public DataNodeHandler(Socket clientSocket, DataNode node) {
    this.clientSocket  = clientSocket;
    this.myNode = node; //data node this thread acts on
  }

  @Override
  public void run(){
    //this is where the parsing, data node commanding, and message return happens
      ...
  }
}
Data Node Handler extends Java’s Thread class and its constructor takes two arguments: the message as a String, and a DataNode object. The reference to Data Node is given as an argument to its thread so that Data Node Handler can perform alloc(), read(), and write() requests on Data Node. With using locks, a data node has to manage its own resources; thus a handler has access to a single instance of a data node (representing a unique host). If data can be modified in one place it is simpler to ensure its safety.
Concurrency is a huge concern for Data Nodes. We can ensure that data is kept safe by performing all actions sequentially, but then requests would take much longer than if processed in parallel. See reader writer problem for more information. Each allocated block has a file name, read lock, and write lock (using Java’s ReadWriteLock class). In order to allow a read on block x1 while writing to block x2 of the same Data Node, each block has its own instance of ReentrantReadWriteLock. For simplicity, a Block object has a read lock (rLock) and a write lock (wLock).
Both locks are declared as final so that they cannot be modified. To emphasize this point, they were not given ‘setter’ methods in the Block class.
We get writer preference for free with Java’s ReadWriteLock, i.e. if a Data Node Handler is writing to block x1 or requests write access to x1, no readers will be given access to x1. Readers may be given access to any Block other than x1 since Blocks have independent ReadWriteLocks. We also get the ability to allow multiple readers on the same block at the same time from ReadWriteLock. Maximum concurrency is achieved by maintaining separate locks for each block of data, as seen in Block.java:
import java.util.concurrent.locks.Lock;
import java.util.concurrent.locks.ReentrantReadWriteLock;

//contains a block's information (memory location, and necessary locks)
public class Block {
  private String filename; //file where data is stored in a data node
  private final ReentrantReadWriteLock rwLock = new ReentrantReadWriteLock();
  private final Lock rLock = rwLock.readLock(); //reader side of readWriteLock
  private final Lock wLock = rwLock.writeLock(); //writer side of readWriteLock

  Block(String fname){ //create block with filename
    this.filename = fname;
  }

  String getFilename() { //get block filename
    return this.filename;
  }

  Lock getRLock() { //get access to read lock
    return this.rLock;
  }

  Lock getWLock() { //get access to write lock
    return this.wLock;
  }
}
Relevant Files:
- StartDataNodes.java
- DataNode.java
- DataNodeHandler.java
- Block.java
Running and Testing DFS
This is the fun part; we get to see the DFS in action!
We use StartDataNodes.java and Process Builder to start multiple Data Node processes on unique ports - because no one wants to start 100 data nodes individually. Each process is independent and does not communicate with the other Data Nodes. This means that they manage their own data and have their locks. Stderr and stdout messages are directed to a log file named DNode_$port.log.
- Start Data Nodes on the command line:
$ pwd /Users/kristinekunapuli/projects/DistributedFileSystem $ startDN="java -classpath bin/ StartDataNodes" $ $startDN $ All data nodes are running...- use
toporps -ef | grep javato verify that all Data Nodes are running StartDataNodes.javastands up all Data Nodes and then exits, so there’s no need to put it in the background
- use
- Start Name Node on the command line:
$ startNN="java -classpath bin/ NameNode" $ $startNN& $ ps -ef | grep java 503 2145 1 0 11:31AM ttys001 0:00.22 /usr/bin/java -classpath bin/ DataNode 65530 503 2146 1 0 11:31AM ttys001 0:00.22 /usr/bin/java -classpath bin/ DataNode 65531 503 2147 1 0 11:31AM ttys001 0:00.22 /usr/bin/java -classpath bin/ DataNode 65532 503 2153 785 0 11:32AM ttys001 0:00.11 /usr/bin/java -classpath bin/ NameNode 503 2156 785 0 11:33AM ttys001 0:00.00 grep java $ lsof -i -n -P | grep TCP | grep java java 2145 kristinekunapuli ... TCP *:65530 (LISTEN) java 2146 kristinekunapuli ... TCP *:65531 (LISTEN) java 2147 kristinekunapuli ... TCP *:65532 (LISTEN) java 2153 kristinekunapuli ... TCP *:5558 (LISTEN)- use
lsofto verify that the communication ports are up and running on the expected ports - start Name Node with
&on the command line to put it into the background; this means we can continue to enter commands in the same terminal while the process is running
- use
- Start Client:
$ startC="java -classpath bin/ Client" $ $startC ::- start Client; we don’t put it into the background because we interact with the Client - it is our interface with the DFS
- if you’re new to using a terminal or shell scripting,
startC="java -classpath bin/ Client"creates a variablestartCwith the contents"java -classpath bin/ Client"(which is how we start a java process on the command line) - we can refer to our variable again by adding
$in front of it, e.g.$startC
- Use the DFS by sending Client commands
- add data to DFS using the format
append $filname $text; for this example create a file, a.txt, and add “first test message”::append a.txt first test message - then, add a second messsage
::append a.txt second test message - verify contents of a.txt using read command of format
read $filename; add a third message and read a.txt again::read a.txt first test message second test message ::append a.txt third message ::read a.txt first test message second test message third message - we can add multiple files
 ::append b.txt new file
 ::read b.txt
 new file
This is a toy example, but it can easily be extended into a useful data storage/retrieval application.
We can verify that the contents have been stored on disk by inspecting data_$port directories. Remember that any Data Node logging information can be found in DNode_$port.log in the working directory.
- add data to DFS using the format